
"So i am new to this game coding area, and, i wanted to know how can i start with game(rpg) making and where do i begin?" ---questions from Reddit
If you've ever felt lost in this process, this article will answer the question of where to start when making an RPG game. We've put together a systematic learning roadmap for beginners, from the basics of sprite importing and tile map creation to turn-based battle state machines. For each skill, we'll explain exactly what you need to learn and how to practice it. Keep reading!
Planning Before Making RPG Games
Before opening the game engine, you should first clarify these key questions. Doing so will save you a significant amount of time. If you're unsure what a well-designed RPG should ultimately look like, you can explore the best RPG games for real-world examples of how successful RPG systems and design decisions come together.
- Planning the Game World Setting: Does your game take place in a post-apocalyptic wasteland, a magical medieval realm, or a cyberpunk metropolis? The setting determines the art style and direction of character design, and it also defines the scope of the story you can explore.
- Set down the core gameplay mechanics: How will players overcome obstacles in the game? Will they collect and trade items like in Pokémon, or rely on a grid-based system and probability calculations like in Fire Emblem?
- Define player characters and progression paths: Will players control a single character or lead a squad? Will progression be based on earning experience points by defeating enemies, or by completing specific story events?
- Game economy and resources: Where do coins get spent? How do you balance the cost and drop rates of potions and equipment? A well-defined economy makes exploration and combat more meaningful.
Where to Start to Create Your Own RPG Game
When you first start creating RPG games, you're often overwhelmed by the many components involved, such as character systems, combat mechanics, and so much more. And you might don't know where to begin. Don't worry; I've put together a systematic learning roadmap for beginners
Below is a detailed introduction of the six core routes based on the roadmap, with each route broken down into smaller checkpoints that you'll need to complete one by one.
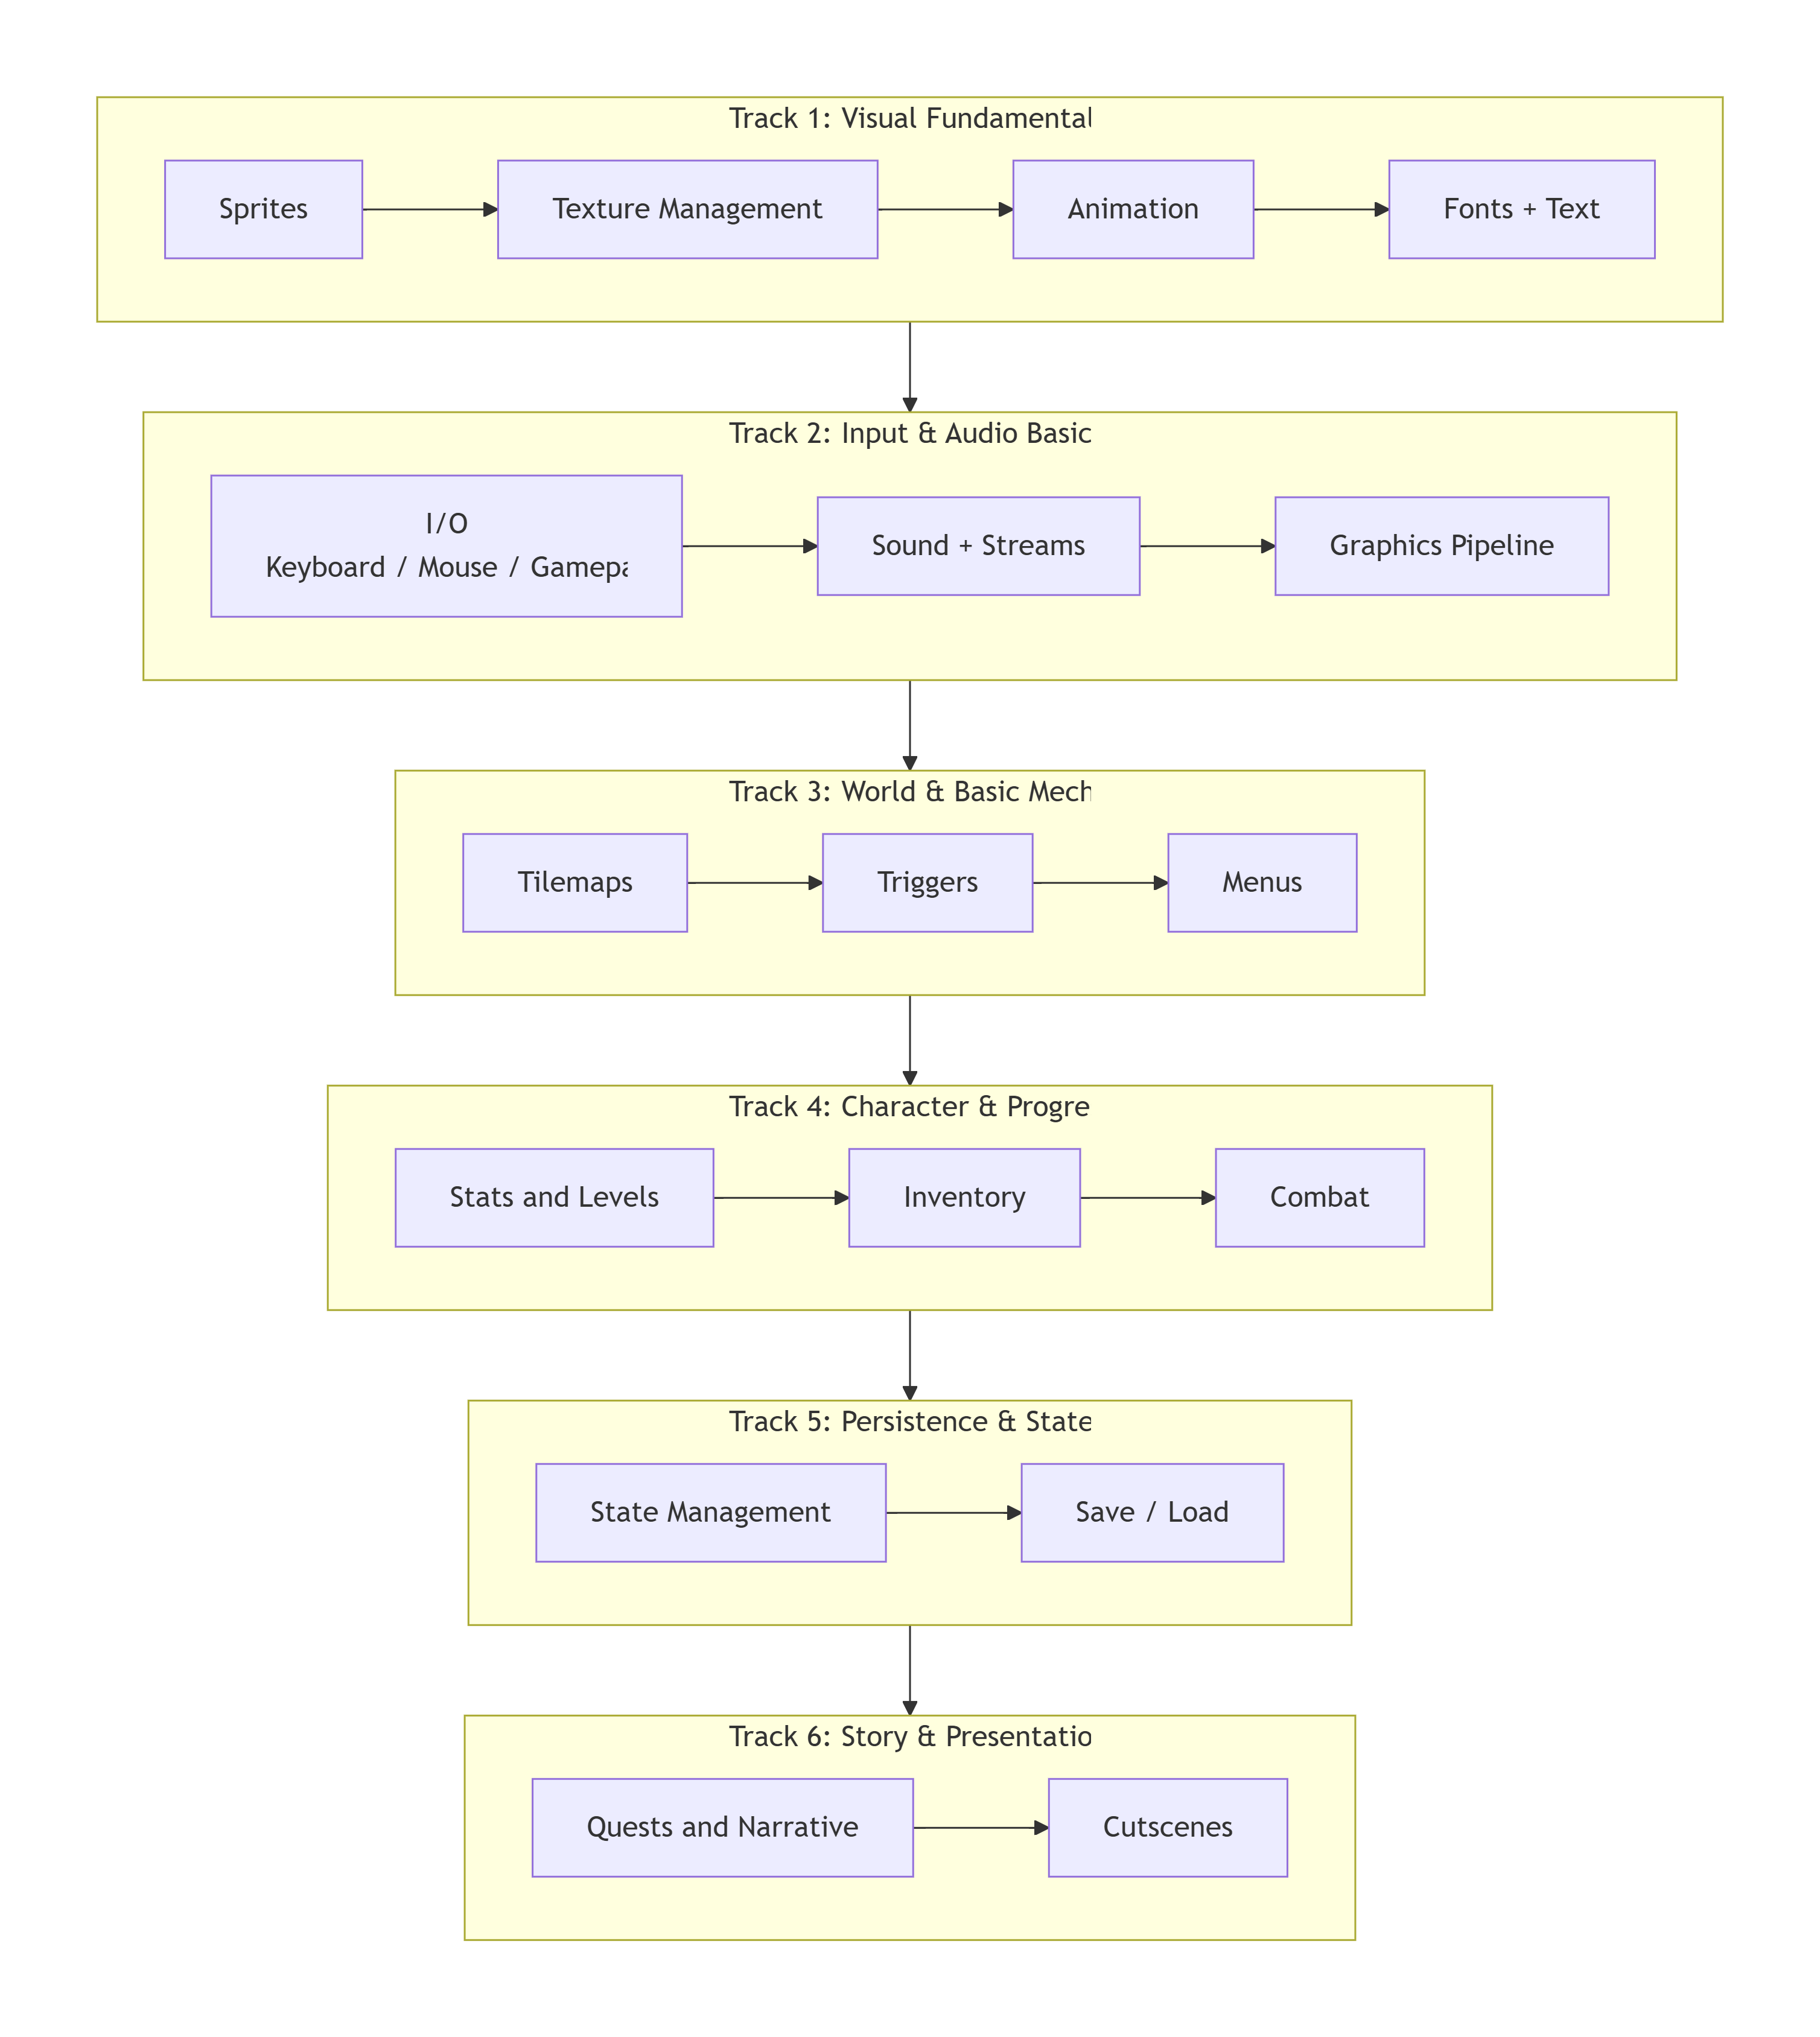
Track 1: Visual Fundamentals
This is the face of your game and determines the player's first impression of your world.
- Learn Sprite Slicing and Importing: You'll need to arrange a character's various animation frames on a single PNG image, then learn how to set up clipping regions in the engine. For example, with a sprite sheet containing a 4x4 walking animation, you must accurately set the width, height, and origin position for each frame so that the character doesn't jitter or shift when the engine plays it.
- Learn texture atlas management: Combining multiple small assets into a single large texture reduces the number of GPU draw calls. You need to master how to use tools to automatically bundle textures and understand how to access specific image regions via UV coordinates in your code, rather than loading a separate texture for every blade of grass.
- Learn to build animation state machines: It's not just about making the character move; you need to establish the logic for states transitioning, for example, defining the variable tracking with three states: "Idle," "Walk," and "Attack." Then clearly specify: the character transitions from "Idle" to "Walk" only when the player presses a directional key, and immediately returns to "Idle" when the key is released. This ensures the character plays the correct animations based on commands during combat.
- Learn font rendering and multilingual preparation: Test the readability of pixel fonts at different sizes in advance. You need to learn how to load font files into the engine and verify that it correctly displays all characters that will appear in the game.
Track 2: Input and Audio
This section makes your game "audible and tactile."
- Learn to distinguish between different key press triggers: You need to master three input detection modes—trigger on press (for menu confirmation), trigger on hold (for character running), and trigger on release (for charged attacks). Write these three triggers as separate functions so you can call them directly wherever input is needed later on, instead of rewriting the logic in every instance.
- Learn multi-device input mapping: Don't limit your game to just the keyboard. You need to create an input configuration table that maps abstract actions like "Confirm," "Cancel," and "Open Menu" to specific controls, such as the keyboard's spacebar, the controller's A button, or the mouse's left click. This way, when a player plugs in a controller, you only need to switch the mapping scheme, and all functions will automatically adapt.
- Learn sound loading and playback strategies: Short sound effects like footsteps and sword swings need to be preloaded into memory and played in one go using Play; however, background music files are typically large and should be loaded using a streaming approach, playing as they are read. You need to master how to call both types of playback interfaces to avoid latency caused by streaming all audio.
- Understand the basics of the graphics rendering pipeline: You don't need to write a renderer from scratch, but you should know the general stages the engine goes through from loading an image to displaying it on the screen.
Track 3: Worlds and Core Mechanics
From here, you'll start actually building your game worlds.
- Learn how to set up a tile-based map system: You'll need to master the use of at least three layers—the bottom layer for ground textures (grass, sand, water), the middle layer for decorations (trees, rocks, houses), and the top layer for objects that block the player's view (door frames, upper parts of walls). Once you've set the rendering rules for each layer, you can quickly draw an entire town just by dragging and dropping.
- Learn how to set up collision detection layers: Not all tiles are walkable. You need to assign a separate collision property to "impassable" tiles, then check the tile's mark at the target location in your character movement code before each move. By separating the collision flags for walls and water surfaces, you can create differentiated terrain where players can swim but cannot walk through walls.
- Learning trigger area implementation: Place invisible rectangular or circular areas on the map to trigger events when the player steps into them, such as playing echoing footsteps when entering a cave, or automatically popping up a dialogue box when approaching an NPC. You'll need to learn how to bind a unique ID and a callback function to each trigger.
- Learn menu navigation: Both combat and shops rely on menu systems. You'll need to master how to draw a list of options (using a loop to draw each text item at a specified position), move the cursor with the directional keys to highlight the currently selected item, and execute the function bound to that option when the confirm button is pressed. The key is to separate "input detection" and "menu rendering" into two independent modules—the former returns only the index of the currently selected item, while the latter is responsible solely for drawing the cursor based on that index.
Track 4: Characters and Progression
This is the key to making the game fun.
- Learn character data structure design: Create a character attribute structure that includes at least the following fields: health, maximum health, attack, defense, speed, level, and current experience points. Use the same structure for enemies as well;
- Learn the formulas for experience points and level progression: Set a specific leveling formula, such as "Total XP required to reach level n = 100 × n²." You'll need to write this in your code so that after each battle, the game checks whether the character has earned enough XP to reach the next level threshold.
- Learning inventory and backpack data structures: A backpack is essentially a two-dimensional data table. You need to create an array or grid structure containing "Item ID, Name, Quantity, Type, and Description." When adding an item, iterate through the grid to find an existing slot with the same ID and stack the quantity there; if none exists, occupy a new empty slot. When using an item, make a decision based on the Type field, if it's consumables, their quantity is reduced, while equipment is moved to the equipment slot and the character's stats are recalculated.
- Learning turn-based combat state machine: Establish a core loop with the following states: "Start Turn → Wait for Player Input → Execute Action → Check if Target is Dead → Switch to Next Unit → Determine Victory/Defeat." Use a variable currentState to track the current state, and handle only the logic corresponding to that state in each Update call. This way, when adding new skill effects, you only need to extend the branch within the "Execute Action" state.
- Learning difficulty curve design: Set a baseline stat table—for example, enemies in Level 1 have 30 HP and 8 Attack. Then establish an increment rule: every 3 levels, increase enemy HP by 20% and Attack by 10%, and check once to see if any new skills can be unlocked for the enemies. Whenever a new enemy variant is introduced, first calculate on paper how many turns it would take a player at the current level to defeat it, ensuring that extreme scenarios—such as one-hit kills or enemies that are impossible to defeat—do not occur.
Track 5: Persistence and State
This section ensures that players can continue their previous adventure the next time they open the game.
- Learn to build a global state manager: Create a singleton script dedicated to storing global variables that span scenes, such as the current level number, which treasure chests have been opened, and the progress of the main quest. All scene transitions and NPC dialogs should query this manager for state information, rather than maintaining their own independent variables.
- Learn how to serialize save files: Organize all key variables from the state manager into a JSON object, then write it to a local file. You'll need to pay attention to data type compatibility, for example, object references cannot be saved directly as JSON and must be converted to IDs or indices before saving. When loading a save, parse the JSON in reverse order to restore the data to the state manager, then jump to the corresponding map based on the scene number in the save file.
Track 6: Story and Presentation
This is the step that breathes life into your game, weaving your code and art into a complete adventure.
- Learn ID and stage management for the quest system: Assign a unique ID to each quest (e.g., quest_001), then set multiple stages for it (0 = Unaccepted, 1 = In Progress, 2 = Completed and Ready to Turn In, 3 = Turned In). When an NPC speaks, first check the stage value of the corresponding quest to determine which dialogue segment to display. When a quest is turned in, advance the stage from 2 to 3 and award the reward. This simple ID-stage model can support all quest structures, from side quests involving errands to complex, multi-branch main quests.
- Learn to build a dialogue system: You need to learn how to display dialogue text character by character (making the text appear slowly, like on a typewriter) and display a flashing downward-pointing triangle at the end of the text to prompt the player to press the confirmation key to continue. It's best to read dialogue data from external text files or data tables rather than hard-coding it into the script, so that designers or you yourself don't have to dig through the code when adjusting the dialogue.
- Learn to implement simple cutscenes: Cutscenes do not require complex camera work. The fundamental operations you need to master are: temporarily disabling player input, using scripts to control characters moving along specified paths, popping up dialogue boxes at specific moments, controlling the camera to pan from the current position and focus on key objects, and finally adding fade-in and fade-out effects to transition between scenes. By combining these basic actions, you can create complete narrative segments ranging from a close-up of a boss's entrance to a character bidding farewell and leaving the village.
The Easiest Way to Make a RPG Game
It might take you several months or even a year or two to learn all of the above, but now, AI game engines are drastically shortening that timeline. They've moved beyond simply "writing a few lines of code for you"; they can automatically generate NPC dialogue and quest text that fits the game's world, and quickly produce scene concept art or pixel character frames based on descriptions.
If you want to see a working prototype as quickly as possible, try using Soonlab.ai to create your first RPG. You don't need to open any traditional game engines; it simplifies the creation process into a straightforward "provide a prompt—generate a game" workflow. The prompt you enter should include several key elements: game genre (such as "Japanese-style turn-based RPG" or "tactical grid-based RPG"), world setting and core conflict (such as "In a medieval kingdom ravaged by a magical plague, the protagonist must collect four elemental crystals"), playable characters and class settings, core combat mechanics, and possible endings. After submission, the platform will generate an RPG prototype within 8 minutes, complete with playable scenes, a dialogue system, and basic combat logic. What you receive isn't just a descriptive text—it's a starting point you can run immediately, test the core loop, and then continue to iterate upon.
Since it's currently in its promotional phase, all registered users can earn 200 points for free just by logging in, which is enough to make your own RPG game for free.


Conclusion
You now have a comprehensive roadmap for your first RPG games. From the first concept art to the save screen and every key narrative milestone; clarifying the game's world-building and mechanics during the planning phase will help you avoid detours; and combining AI game engines with traditional tools allows you to strike a better balance between speed and depth.
Finally, start by completing a small RPG game. Three maps, two NPCs, and one boss battle, walk through the entire game. Completion is always more important than perfection.